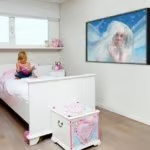
In large areas with little wall space such as libraries, open offices or shopping malls the top rail is a great way to hang pictures, decorations and signs which can be changed and replaced with ease.
It’s also the perfect hanging system to use in combination with recessed ceilings. When you mount the top rail to the wooden side strip of a recessed ceiling, the rail ‘disappears’ into the ceiling. The Top Rail can also be mounted directly onto concrete ceilings.
Some businesses attach the top rail to the top of their exterior window frames and use it to exhibit posters that display their work projects to passers-by on the street.
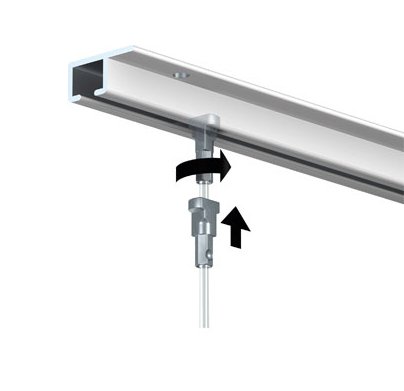
Hanging wires can be twisted wherever you like into the top rail; hanging pictures and photo frames extremely is a cinch. We offer an extensive selection of Artiteq hanging wires. Perlon hanging wires are transparent, so the hanging wires are practically invisible against the wall. Steel wire on the other hand gives your interior walls a more industrial, modern look.
Installing a picture hanging rail onto a ceiling requires careful consideration of both the type of ceiling material and the weight of the items that will be hung.
The best fixing method will depend on both the type of ceiling and the weight of the items you plan to hang. Always refer to manufacturer guidelines and consult a professional.
GENERAL TIPS
1. Pre-Drill: Always pre-drill holes to the size recommended for your specific fixing to prevent material from cracking or splitting.
2. Load Test: Before hanging anything, test the fixing with a load at least equal to what you plan to hang.
3. If the diameter of the installation holes in the top rail is smaller than the diameter of the screws intended for use in mounting the rail, you can enlarge the holes by using a drill.
4. Check Building Codes and Regulations: Make sure to follow any building codes or regulations in your area.
5. Seek Professional Help: For heavier loads, hire a professional.
CEILING TYPES
Below some methods and types of fixings for different ceiling types:
Drywall or Plasterboard (Gyprock) Ceilings
For this we recommend the Fischer Duopower. It is a versatile anchor that is designed to work well in a variety of materials including concrete, brick, and plasterboard (gyprock). For ceiling installations on gyprock, the Fischer Duopower plug offers several advantages:
1. Dual Material: It is made of two different materials, which allows it to expand, fold, or knot depending on the substrate. This makes it versatile and reliable.
2. High Load-Bearing Capacity: Due to its dual-material and intelligent functioning, it offers high load-bearing capacities, which is crucial for ceiling installations where safety is a prime concern.
3. Easy Installation: The plug is easy to install, usually requiring just a drill and a screwdriver. This saves time and labour costs.
4. Self-locking Effect: The design usually ensures that the plug locks itself securely within the material, reducing the risk of it coming loose over time.
5. Minimal Spacing: Because of its strong anchoring, it can be used in applications where minimal edge and spacing distances are required, giving you more flexibility in your installation.
6. Compatibility: It is compatible with a variety of screw types.
N.B. It’s crucial to make sure that the gyprock ceiling can bear the load of the installation. Always consult the manufacturer’s guidelines and consider professional advice when installing anchors into ceilings.
Concrete Ceilings
For this we recommend:
1. Sleeve Anchors: These anchors expand as the bolt is tightened and offer very high load capacities.
2. Concrete Screws: These screws are specifically designed to tap into the concrete, offering a strong hold.
Timber Ceilings
1. Timber Screws: These can be directly screwed into timber beams or joists for a secure fit.
2. Hollow Wall Anchors: If the wood is not solid, these anchors can provide extra support
Metal Ceilings
1. Self-Tapping Screws: Use these for thinner metal ceilings.
2. Machine Screws with Nuts: Use these for thicker, more robust metal ceilings where access to both sides is possible.
Tiled Ceilings
1. Plastic Anchors: These can be used in the grout lines for lighter rails.
2. Sleeve Anchors: For heavier loads, these can be used, but extra care must be taken not to crack the tiles.
HOW TO USE THE TOP RAIL
Here’s a link to an article about the top rail. It has many photos showing different ways to use the top rail.
Pay attention to getting the balance right. If your artworks lean against something e.g. a wall or a glass window, balance won’t be an issue.
However, if you would like your pictures to hang freely, then you will need to find a way to ensure balance and avoid forward tilt.
Take a look at the first and second picture in the article. You will see that two paintings have been placed back to back for balance.
Each picture you hang requires two hooks for stability. These hook into d-rings and need to be attached to 2 hanging wires. Ensure you have good quality d-rings.