-
Australia-Wide Delivery
-
Large Stock Ready
-
Daily Dispatch
Australia-wide delivery - dispatched daily
How do I attach the picture to the hanging system?
How to Attach Your Picture to Your Picture Hanging System
The Essentials You Need
To hang your pictures from an art track, you will need the following items:
- A picture hanging rail (art track)
- Two hooks and two hanging wires
- Two D-rings
Step-by-Step Guide
1. You have chosen your picture rail
There are a variety of rails that cater to different preferences and requirements. You can choose between wall-attached, ceiling-attached and built-in rails.
Let’s say you have chosen our cheapest wall-attached rail the Artiteq Click rail:
This rail is a versatile and can be easily installed. It provides a sleek, professional look.
- Rail Widths: Available in 2 or 3 meters (200 cm or 300 cm).
- Colors: White, white primer (paintable), and brushed aluminum.
- Weight Bearing: Supports up to 30 kg per meter.
- Installation: Suitable for all ceiling types, including plaster cornices, shadowline recesses, and square set ceilings.
- Accessories: Comes with a FREE Fastener Kit including ‘Click and Connect’ clips, plugs, screws, and end caps.
- Pricing: check here
Other options : Click Rail PRO , Combi Rail Pro Light and more.
2. Attach Hanging Wires to Your Picture Hanging Rail
Start by attaching two hanging wires to your picture hanging rail.
You definitely need two. If you try with just one hook, your picture will be unstable. A light breeze, or someone walking by and accidentally knocking the artwork can move it out of position. Using two hanging wires will ensure your picture hangs balanced and stable.
You can choose between the Twisters, Twister Cliq2Fix, Perlon+Loop or solid slider. The most popular choice is the Artiteq Twister 1mm 150cm hanging wires, available in both transparent Perlon/Nylon and steel wire options. These wires are practical because you can insert them anywhere ( you just twist them in. See illustration below) along the hanging rail and you can easily move them back and forth along your rail. This means you can position your picture wherever you want on the wall.

What length should the hanging wires be?
As most ceilings are around 2.7m (270cm) high, hence a hanging wire that is 1.5m (150cm) long is an optimal choice. They also come in different lengths of 150cm, 200cm, 300cm, catering to your preference.
What diameter should the hanging wires be?
The hanging wires come in 1mm or 2mm diameter. Whether you go for 1mm or 2mm diameter depends on the weight of your artwork. Most artwork is quite light, a picture becomes heavy if you have it framed behind glass.
Is your artwork under 10kg? If yes, use 1mm Twisters. Each 1mm Twister together with a 1mm micro grip hook can hold a maximum weight of 5 kg. With 2 1 mm hanging wires, you could hang a maximum weight of 10kg.
Not sure how heavy 10 kg is? Just hold your artwork and weigh yourself with it on a scale. Then, step off and subtract your weight. Voilà, you have the weight of your artwork!
Do you have solid timber frames with glass protecting the artwork, if yes, then choose the Twister 2mm hanging wires.
Alternatively, if you wish to hang your artwork on a slanted wall or if your artwork is heavy, you can opt for the solid slider:
- The hanging wire’s tip is inserted from the end of the rail.
- It cannot be inserted anywhere into the rail like the Twister hanging wire can. Hence you might want to leave a gap at the end of your picture rail, so that you could slide the solid slider in and out as you wish from the end of the rail.
- It can be used on slanted walls.
- It is recommended for excessive heights and to prevent theft (steel hanging wire).
- This picture hanging wire can hold a maximum weight of 20 kg.
To attach the hanging wires:
- Insert the wire into the twister and twist it into the rail.
- Ensure the wires are securely in place before proceeding.
- There should always be two of you to hang your pictures.
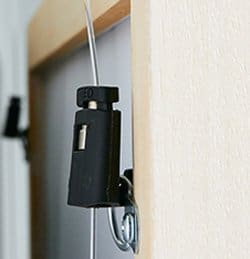
3. Slide Hooks onto Hanging Wires
Next, slide your hooks onto the hanging wires. The popular choice is Artiteq Micro Grip 1 mm hooks as most pictures weigh under 10kg.
- Micro Grip 1 mm hook: Suitable for 1 mm diameter twister hanging wires, supporting up to 10 kg per pair.
- Micro Grip 2 mm 20 kg : Suitable for 2 mm diameter twister hanging wires, supporting up to 40 kg per pair.
- Micro Grip Lock 2 mm : Suitable for public setting, if you are afraid of theft. This lock will secure your artwork with the D-rings behind your artwork. Use steel hanging wires for added protection.
To attach the hooks:
- Feed the wire into the hole at the top of the hook.
- Adjust the hook to the desired height by sliding it up or down the wire.
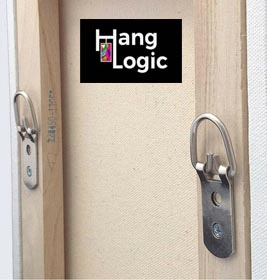
4. Does your picture have D-Rings at the back of it
Check whether your frame has D-Rings (See photo below). They are essential for ensuring your picture hangs securely and balanced. Attach two D-rings to the back of your picture frame or canvas stretcher, positioned as high as possible to reduce forward tilt. We suggest placing the D-rings approximately 6 cm below the top of the frame.
-
Types of D-rings:
- 1-screw D-ring: Suitable for small to medium-sized pictures.
- 2-screw D-ring: Offers more stability for larger frames.
- 3-screw D-ring: Best for heavy and oversized artworks.
D-rings are available in various sizes to match your needs. Ensure you choose the right type based on the weight and size of your picture.
5. Hook Your Picture onto the Hanging Wires
Finally, slide the hooks into the D-rings on the back of your picture. This provides more stability than attaching the hooks to a wire or string on the back of the frame. When you hook onto a wire, the hook tends to slip and this makes it hard to hang your artwork straight. Slip the hook into the D-ring and adjust it to the height you want your picture to be hanging at.
By following these steps, you can easily hang your picture securely and beautifully.
Advanced Techniques and Tips
These techniques and tips help you hang your pictures even better!
1. Using Multiple Hooks for Large, heavy Artwork
For larger or heavier artworks, consider using more than two hooks and hanging wires. This provides additional stability and support, ensuring that your artwork remains securely in place.
Step-by-step guide for using multiple hooks:
-
- Attach two additional hanging wires to your picture hanging rail.
- Slide extra hooks onto these hanging wires.
- Attach corresponding D-rings to the back of your picture frame.
- Hook the additional hooks into the D-rings.
By distributing the weight more evenly, you reduce the risk of your picture tilting or slipping.
2. Ensuring Perfect Alignment
Achieving perfect alignment can be challenging, especially when hanging multiple pictures. Use a spirit level to ensure your pictures are perfectly horizontal.
- Pro tip: Use a laser level for precise alignment. This tool projects a straight line onto your wall, making it easier to align multiple pictures at the same height.
Troubleshooting Common Issues
Even with the best picture hanging systems, you may encounter some common issues. Here’s how to troubleshoot them:
1. Picture Tilting Forward
If your picture tilts forward,check the position of your D-Rings. If they are positioned too low on the back of the frame, and the picture is light, it will lean forward. To fix this, reposition the D-rings higher up, approximately 6 cm below the top of the frame.
If you want to further reduce the tilt, consider using a Tilt reducer or frame spacer. To find more tips on how to prevent frames from tilting forwards , check out this link on Artiteq’s website.
2. Uneven Hanging
If your picture is hanging unevenly, use a spirit level to check the alignment. Adjust the position of the hooks on the hanging wires until the picture is level.
Add Media
3. Incorrect picture height placement
Just move your hook up and down along your hanging wires !
Click the link below to dive deeper and learn more!
· At what height should you install the Artiteq hanging system?
· What height to hang your pictures for optimal viewing
Conclusion
In a nutshell, just attach two hanging wires to the rail, slide on the hooks, and hook them into the D-rings on your picture. Picture hanging rails save your walls from damage and make hanging artwork a breeze!
Any other question?
Call us : +61 432 924 305
Email us :team@hanglogic.com.au
Visit us at our Showroom: 27 Warwick St, Largs North 5016, Adelaide, South Australia
Phone, Email inquiries: Mo-Fri, 10 a.m. – 5p.m.