Rendered Bricks: How to Hang Pictures on These Walls?

Rendered Bricks: introduction
Traditional masonry walls or rendered bricks? It’s a common dilemma.
Traditional masonry is widespread across Australia and hold timeless aesthetics, while rendered bricks is unquestionably a modern way to immediately renovate a home.
Whether you’re building a new home, scheduling an extension, or looking to renovate your facade, deciding between masonry and rendered bricks can be a challenging decision. Both serve their function of protecting your living space from the weather, but they also offer high fire resistance, great sound insulation, and pest protection.
Why Rendered Bricks?
Rendered bricks are versatile: many homeowners decide to use rendered walls for their whole property, mainly for aesthetic reasons. Rendered bricks are normally available in different colors and designs, as well as finishes, which can be rough or flat, textured or course, natural or coloured, etc.
Rendered walls also provide excellent protection against penetrating damp, which is very important in old houses with solid walls. If dampness penetrates a solid wall, your home will be affected by a whole lot of problems from rotting skirting boards and stained plaster to mold – ridden carpets.

Rendered Bricks: Risks
One of the disadvantages of rendered bricks is their tendency to crack: the strength of the render will vary according to the type of render used and the technique of application. Nevertheless, all render tends to develop hairline cracks overtime. Humidity penetrates the walls, freeze and expand, blowing out the surface.
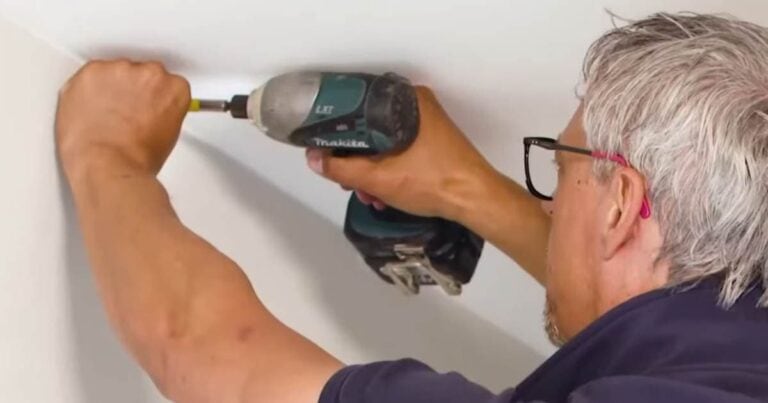
Another issue is when you want to hang pictures onto it: applying nails and hooks straight onto the surface of a rendered wall is most likely a recipe for disaster. The nails can cause further cracks to open, and so you will need to repair your walls every time you decide to install new artworks/photos to your wall, or simply rotate your old paintings with new ones.
Repairing small areas up to 0.5m² costs around $120. Typically, it will require removing the old render, raking the joints, scrubbing the wall and then applying two coats of render.
Such a shame if you think that rendered walls have such an attractive look that can beautifully suit an art gallery, which is the case study we discuss in the following.

How to Hang Art on Rendered Bricks: A Case Study
One of our clients, Angela, from Adelaide, contacted us in July. Angela is in the process of managing the transition of the Campbelltown Art House, a local arts community organization, to a new location.
The new hosting building for the art gallery will be the Brookside Cellars, in Tranmere, less than 10Km East of Adelaide. This unique and special building has been selected by the Council to support local arts and culture. Brookside Cellars is indeed unique in its heritage character, appeal and location. It has distinctive exposed brick walls and beautiful trussed roofs, as this was a common construction technique in the 1800s. This large space will make one of the largest Community galleries in South Australia.


However, a question immediately emerged: how to transform this charming place in an art gallery, while preserving these unique, yet delicate, rendered walls? An art gallery is by definition a place where artworks needs to be rotated on a regular basis. Having to constantly drill and repair these stunning rendered walls would not only be hard to see, but it would indeed be an expensive exercise, both in terms of money and time.
Angela is on the seek of a solution which has to be budget friendly, long-lasting and easy to use.
Do you want to know what did she choose? Read the following.
How to Hang Art on Rendered Bricks: The Best Solution
Angela booked an appointment with Hang Logic mid of July. We visited the beautiful Brookside Cellars and we were immediately hooked by the warm, calm, charming atmosphere that this place transmits to you. And we immediately agreed with Angela that having an art gallery hosted here would be such a tasteful choice!
But how to deal with those beautiful walls, when rotating artworks?
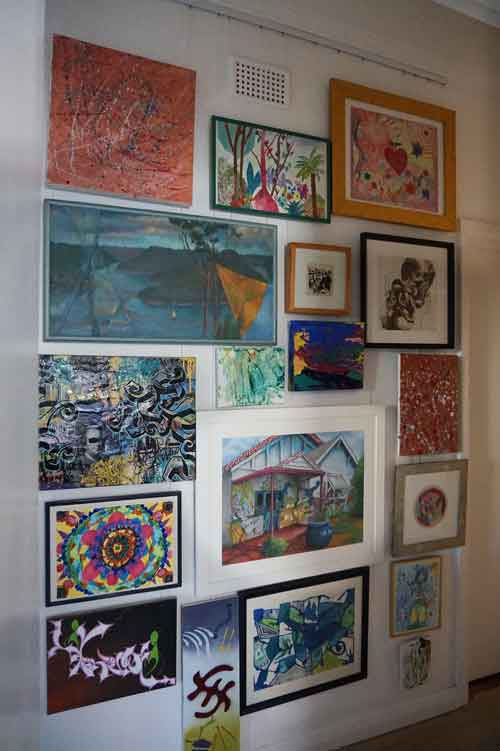
Our answer: don’t touch them. Instead, hang your artwork from with a picture hanging system.
A picture hanging system is composed by three elements:
- An aluminium rail
- A set of hanging wires
- A set of hooks
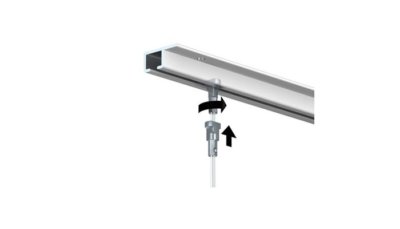
The rail can be attached to the wall or to the ceilings. It can be ordered in different finishes or even painted in the colour of your preference.
The hanging wires are simply inserted into the rail, with which they solidly engage. The hanging wires can be then sled at any time along the entire length of the rail.

The hooks come in an arrange of load capacities. The droppers (or hangers) is inserted into the hook’s body and the hook adjusted at the desired height. The hook can be sled along the entire length of the dropper by just pressing a button located on top of it, by pressing this button, you will disengage the automatic clutch of which they are provided, so that you can slide and adjust them. As the button is released, an internal spring will re-engage the automatic clutch, so that the hook can hold its position and sustain the load it is designed for.
Hang Logic can supply hooks for a wide variety of applications: from hooks to hang light artworks to heavy dusty hooks to hang heavy mirrors, up to 40Kg if you are using a couple of wires and hooks.
Find Your Hangers and Hooks Here
Artiteq Top Rail: The Solution Angela Went For
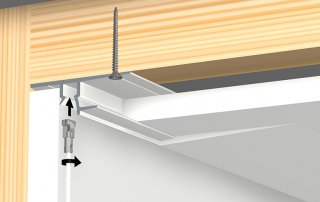
Artiteq Top Rail is designed to suit ceiling-attached picture hanging systems. In a ceiling-attached system, the rail is attached directly to the ceiling, and more exactly, to its suitable structural elements (beams, rafters). This solution allows you to leave your walls untouched!
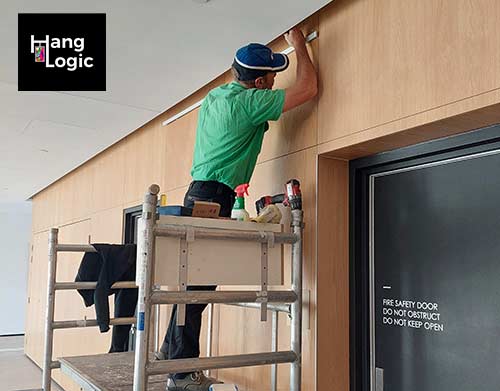
The Top Rail is attached by means of screws of suitable length and design, depending on your specific situation. In the Angela’s project, we recommended using wooden screws to attach the Top Rail to the timber beams.
Its is also fairly common, especially in commercial buildings, to have concrete ceilings. Not a problem: The Top Rail has pre-drilled holes along its entire length. You can use those as reference to mark and pre-drill your holes in the concrete ceilings. You will then use suitable concrete plugs and screws to fix the Top Rail to the ceiling.
Top Rail can withstand a maximum load of 20Kg/meter of length, which perfectly suited Angela’s requirements.
How to Hang Art on Rendered Bricks: Built-In Hanging Systems
Do you want to know what the ultimate product is, in terms of art hanging systems? A built-in art hanging system!
This solution is guaranteed to amaze your visitors, because once installed it becomes completely invisible.
These aluminum extrusions can be wall-attached or ceiling-attached. One side of the rail is used to fix it to the building element (wall, beam, concrete ceiling, etc.). The profile has a specific cavity/surface where either a 10mm or a 13mm plasterboard sheet can be inserted or fixed on. That way, all you will notice once installed is a thin (4mm) cavity riding along the area where the wall and the ceilings join. Both hanging wires and hooks can be used the same way you would with any other hanging rail, so the flexibility and practicality of the system is still the same. Only (big) difference is that the rail is completely hidden behind the plaster. Genius!
Home owners, landlords and property owners (apartment blocks and commercial office blocks) love Artiteq’s built-in hanging rails. These integrated picture tracks are regularly specified by top Australian architects and installed by Australia’s best builders and art installers for upmarket homes and offices.

Types of Built-In Art Tracks:
There are essentially four types of built-in art tracks:
- Shadowline art tracks: there rails can be either wall or ceiling attached. Their peculiarity is that they are particularly suited to those application where a designer wants to create a recession in the ceiling, or a P50 profile is in use. They come in two variation, to suit either 10mm or 13mm thick plasterboards.
- Ceiling Strip, which is a wall-attached built-in system. This system suits plasterboard of any thickness.
- Deco Rail: this is a wall-fixed picture hanging rail that you mount behind your cornice. Deco Rail can be a fantastic alternative for heritage buildings when you want to safeguard that old-world charm of the past.
- Art Strip: this art track comes with a timber beam incorporated into it. You will attach the timber beam to the structural elements of your frame (other beams, rafters, studs). The Art Strip is a great option for ceiling-tile ceilings, and the only one among all the built-in systems to have a weight bearing capacity of 50kg per meter (all other systems are rated 20Kg/m).


These built-in hanging rails are unique to Artiteq and are not manufactured or stocked by other picture hanging suppliers, art shops or do it yourself/hardware shops.
Types of Built-In Art Tracks: What Would Best Suit a Rendered Wall?
If you have a rendered brick wall, or any sort of wall which is not practical to drill in (e.g. stone, concrete, old bricks) we highly recommend a ceiling-fixed system. This is because you don’t want to drill into these kinds of walls, either because they are hard and time consuming to drill in (concrete, rock) or because they are very brittle or prone to cracking (old bricks, sandy stones). You certainly want to avoid putting more damage on your wall either when installing the system as well as when using it, e.g. when replacing artworks with new ones.
Whether they are built-in or not, the ceiling-attached systems allow you to keep the walls of your gallery in pristine conditions at all times.
Angela wanted something that is simple, not necessarily heavy-duty, but definitely practical to use even for a non-expert gallery employee. She also demanded for the final product to be long lasting and cost-effective.
We have recommended Artiteq Top Rail as the best product to suit her need, in combination with stainless-steel hanging wires and ratchet hooks.
Although not as fancy as a built-in system, we found that Top Rail is the option that merges best with the essential, retro, yet fashionable style of her space. The Top Rail has a weight bearing capacity of 20Kg/m, which is in line with what Angela was after.
The choice of stainless-steel hanging wires was dictated more by aesthetical considerations, rather than practical. The stainless-steel hanging wires can provide that nice “industrial” look that combines beautifully any building with rendered or exposed bricks. In addition, stainless steels last a lifetime and never need to be replaced.
The Ratchet hooks have an elegant and discrete design and can hold up to 15Kg of weight, which again, exceeds Angela’s requirements but it offer the best look and lots of practicality.
Finally, all Artiteq products are quality-certified by TUV and come with a 10-years warranty, which is reassuring for anyone who is planning on setting up their own gallery and which will be predictably very busy rotating artworks on a regular basis.


Time for an upgrade?
Are you looking to know more about how can you improve the beauty and efficiency of your art gallery, private home, office, etc.?
Whether you are looking for something simple to keep your rendered brick walls tidy and pristine or comprehensive systems to create an impressive art display, we are just a phone call away.
Contact us today by calling us on 0432 924 305 or email us at team@hanglogic.com.au for a FREE consultation. Or, if you prefer to work things out yourself, sift through our frequently asked questions.